Popsicle Matching Game
Builds on: Color identification, following directions
What you'll need:
2 sheets blue construction paper
2 sheets green construction paper
2 sheets pink construction paper
2 sheets red construction paper
2 sheets white construction paper
10 popsicle sticks
scissors
ruler
pencil
liquid school glue
What to do:
Use your ruler and pencil to mark out a 4 1/2" x 6" rectangle on each piece of construction paper. Use your scissors to cut them out. Fold each piece in half widthwise or "hamburger" style so that the paper now measures 4 1/2" x 3" when folded.
To make a popsicle spread plenty of glue around one half of the inside of a sheet of paper, place the top half of a popsicle stick on top of the glue and position it to where a popsicle stick should be on a popsicle. Fold the other half over and hold together for a few seconds or place it under a heavy book while you make the other popsicles. Once the glue is dry you can add another layer of the same colored paper to add strength if you need to.
*Making these is a great activity to do with a helping Roo.
The game is simple. Start by giving your Hoot any 2 colored popsicles, you take the other 2 matching popsicles and sit across from your Hoot. Lay your popsicles on the floor in front of you, wait until you have your littles attention, then say " _______ here's my green popsicle. (hold up your popsicle) Where is yours? " On average it takes kids 10-15 seconds to respond to a question, so give them time to process before asking again if they can find their green popsicle. Celebrate a right answer with lots of "Yays!" and hugs. We like to pretend to eat ours. Your little might prefer to hold their popsicles instead of laying them on the ground and that's ok as long as they are able to indicate which on is the one being asked for.
Add more colors once your little gets the idea and starts to recognize colors a little better.
Thursday, September 17, 2015
Tuesday, September 8, 2015
Pumpkin Patch
Builds on: hand strengthening, sensory development, vocabulary

What you'll need:
1 package of cream filled chocolate cookies- cream removed
1 package of candy pumpkins
A large spoon
Rectangular container
Small cultivator/ hand rake
Toy tractor
What to do:
Place
just the chocolate cookies into the container and hand your Hoot the
large spoon. Show them how to use the spoon
to crack, smash and crumble the cookies into tiny pieces so that it
looks like soil. Make sure you offer a helping hand so that they don't loose interest before the work is done. Place the tractor in the "soil" and the opened bag of
candy pumpkins on the side with the small cultivator. You can bury the
pumpkins and have your kids dig them out. You can read a story about
farming or growing pumpkins or you can just
set them loose and see what happens. Either way it's a fun activity
that will help to strengthen little hands with all the smashing and
provide a fun dramatic activity with multiple sensory elements.
 *Don't forget to talk about how it smells, feels and even tastes to help develop the senses and build descriptive vocabulary.
Decorating with spiders
Builds on: Hand eye coordination, fine motor skills and gross motor skills.
I
love how just decorating the house can elicit so much laughter from
kids. It's as simple as a bag of spiders, a bag of cotton webbing and
double sided tape from the dollar store.

What you'll need:
1 bag of cotton webbing
1 bag of 100 black and orange spiders
Double sided tape
2 bowls
What to do:
I
like to divide the spiders into two bowls equally and set one aside for
later before we do anything. After hanging the webbing on the walls and
corners of the house outside I place the double sided tape on to the bottom of the spiders.
Once they've all been taped we take to the front door sticking the spiders everywhere. I of course get the high parts while both Hoots and Roos get the middle and lower parts of the door. It doesn't take long for the kids to start giggling because it always seems that about half of the spiders like to pop off once they've been placed. While the kids continue to place spiders I scoop up the escapees and re-tape them for the kids to try again. The extra stubborn ones get set aside for the next part.
Once they've all been taped we take to the front door sticking the spiders everywhere. I of course get the high parts while both Hoots and Roos get the middle and lower parts of the door. It doesn't take long for the kids to start giggling because it always seems that about half of the spiders like to pop off once they've been placed. While the kids continue to place spiders I scoop up the escapees and re-tape them for the kids to try again. The extra stubborn ones get set aside for the next part.
 When
all of the spiders from the first bowl have been placed on the door it's time for the webs.
I generally will place them about 5-6 feet up depending on throwing
strength. I place the bowl of spiders on the floor and tell the kids
that they have to get all of the spiders to stick. The plastic spiders
legs are just thin enough and the webbing is just fine enough that even a
weakly thrown spider can stick if it touches. The fun part is watching
the spiders fall back down on the kids when they don't stick.
When
all of the spiders from the first bowl have been placed on the door it's time for the webs.
I generally will place them about 5-6 feet up depending on throwing
strength. I place the bowl of spiders on the floor and tell the kids
that they have to get all of the spiders to stick. The plastic spiders
legs are just thin enough and the webbing is just fine enough that even a
weakly thrown spider can stick if it touches. The fun part is watching
the spiders fall back down on the kids when they don't stick.When you're done you have a spooky decorated house that the kids can be proud of.
Pumpkin Drawing and Cleaning
Builds on: creativity, life skills

What you'll need:
Small pumpkins
Washable markers
Wet wash cloth
What to do:
Set
out the materials onto your activity table. Let your kids know that
it's ok to use the markers to color on the pumpkins; show them how to do
it if they seem unsure. After the pumpkins are completely covered you
can show them how to use the wash cloth to wipe off all of the marks.
Let them repeat this for as long as they seem interested and aren't wandering off to color on everything else in the house.

Felt Board Monsters
Builds on: creativity and imagination

I actually got this idea from And Next Comes L
for a felt board activity and decided to make some of my own monsters.
It was a total hit! Hoots, Roos and even older kids love seeing what
kind of monsters they can create together.
What you'll need:
6 different colored sheets of felt
1 sheet of white felt
Black paint pen
Scissors
Felt board

What to do:
Cut out one large monster body shape with arms and legs from each of the colored felt sheets. It's best to have a different shape for each color to make it more interesting for the kids.
 Using
the white felt cut pairs of different sized shapes for the eyes. Color
small solid circles to make the eyeballs as pictured. While those are
drying use the left overs of the colored and white felt sheets to cut
out decorative pieces like hair, horns, clothes and teeth. What ever you
can think of.
Using
the white felt cut pairs of different sized shapes for the eyes. Color
small solid circles to make the eyeballs as pictured. While those are
drying use the left overs of the colored and white felt sheets to cut
out decorative pieces like hair, horns, clothes and teeth. What ever you
can think of. Monday, September 7, 2015
Pumpkin Bowling
Builds on: Hand eye coordination, gross motor
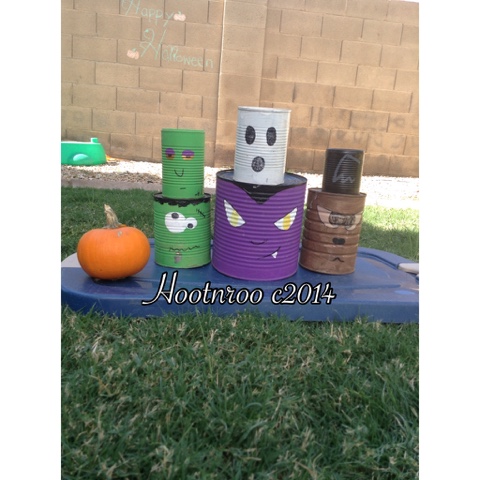
What you'll need:
8-10 Empty food cans
Acrylic paint
Paintbrushes
Card board
Drop cloth
2 small pumpkins
What to do:
Acrylic
paint does stain so you should put down a drop cloth first and change
everyone into clothes that can get dirty. Place the cans, paint and
paint brushes out with a large enough piece of card board for all of the
paint you are using. Place a dollop of each colored paint onto the
cardboard and start painting your cans to resemble Halloween characters.
Place your kids about 3 feet from the cans with a
pumpkin and show them how to roll the pumpkins to knock down the wall. Since
smaller pumpkins have bumps and aren't round they'll wander as they roll
creating a fun challenge for the kids to overcome.
*Don't let the kids throw the pumpkins since they could really hurt someone.
Friday, September 4, 2015
Sheer The Sheep To Make Yarn
Builds on: dramatic play, sensory

What you'll need:
a square piece of clear contact paper
scissors
painters tape
permanent marker
1 bag of cotton balls
a low window
What to do:
Use the permanent marker to draw the outline of a sheep on the front of the contact paper. Tear 4 pieces of painters tape measuring the length of each side of the contact paper from the roll. Remove the protective paper from the adhesive side of the contact paper and place your drawing against the window, sticky side facing you. Use the pieces of tape to secure the sides of your picture to the window. Now grab your bag of cotton balls and invite the kids over.
Talk as much as you can about sheep as the cotton balls are put on and pulled off. Say the sheep is cold when it has no wool and hot when it does. Talk about how the "wool" is soft and rub it on an arm. Show them how to pull the pieces apart and twist it in their fingers if they are older. Make sheep noises. Anything you say is building your littles vocabulary so chat it up and acknowledge any grunts as a response.
Related Resources:
Follow the link to a video about wool pulling and spinning.
Wool pulling and spinning video
Subscribe to:
Posts (Atom)